- MuMu berhenti merespons saat memuat atau membeku pada 40%
- MuMu berhenti merespons saat memuat atau membeku pada 100%
- MuMu stops responding while loading or freezes at 45%
- MuMu stops responding while loading or freezes at 30%
- MuMu stops responding while loading, freezes at 99%, or prompts a reason unknown error
- MuMu stops responding while loading or freezes at 10%
- PC masuk ke layar biru setelah memulai emulator
- Desktop emulator memiliki layar splash dan ikon diagonal
- Desktop menjadi ukuran yang berbeda setelah memulai emulator dan tidak berfungsi dengan baik
- Program Berulang tidak merespons
- Installation & Startup Error Codes
- Way to solve Graphics spec. too low for dx 11.0 or OpenGL 4.3
- The Emulator Failed to Respond
- Enable VT on Biostar
- Enable VT on Maxsun
- Enable VT on Jetway
- Enable VT on Soyo
- Enable VT on Colorful
- How to enable VT
- Enabling VT in Toshiba PCs
- Enabling VT in MSI PCs
- Enabling VT in Lenovo PCs
- Enabling VT in HP PCs
- Enabling VT in Gigabyte PCs
- Enabling VT in Dell PCs
- Enabling VT in ASUS PCs
- Enabling VT in ASRock PCs
- Enabling VT in Acer PCs
1. Home-purpose laptops (Y, Z, G, N series) with Intel chipsets
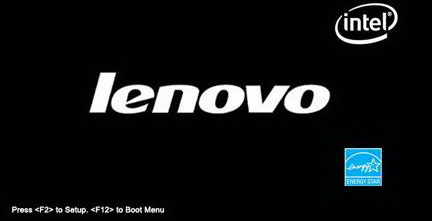
① Reboot your PC and access BIOS:
Right on the first interface after booting, repeatedly press "F2" (or "Fn+F2" for certain models) to access BIOS.
Remark: (What if I keep on failing to access BIOS because the startup happens too fast?)
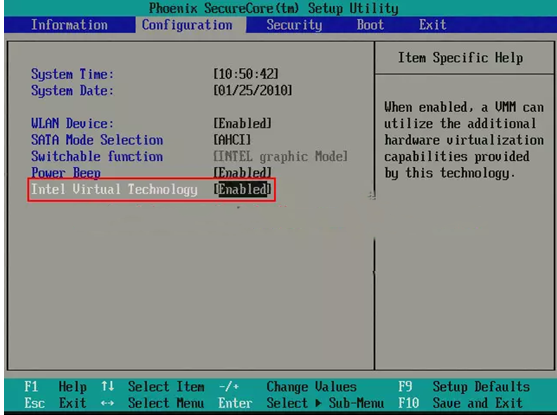
② Select "Configuration" → "Intel Virtual Technology" → Change it to "Enabled" → Press F10 to save the setting and exit.
2. Home-purpose laptops (Y, Z, G series) with AMD chipsets
① Reboot the PC and access BIOS:
Right on the first interface after booting, repeatedly press "F2" (or "Fn+F2" for certain models) to access BIOS.
Remark: (What if I keep on failing to access BIOS because the startup happens too fast?)
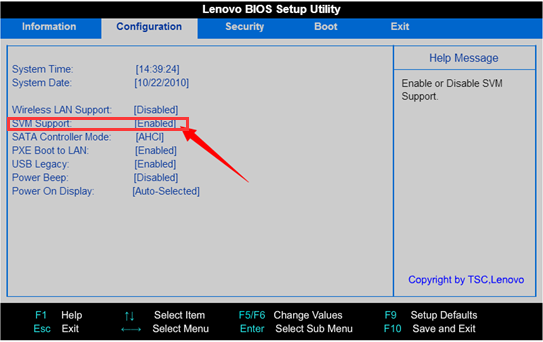
② Select "Configuration" → "SVM Support" → Change it to "Enabled" → Press F10 to save the setting and exit.
3. Business laptops:
① Reboot the PC and access BIOS:
Right on the first interface after booting, repeatedly press "F1" to access BIOS.
Remark: (What if I keep on failing to access BIOS because the startup happens too fast?)
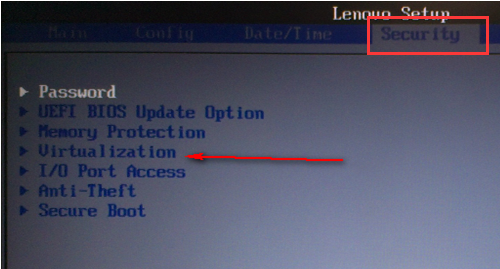
② Select "Configuration" → "Virtualization" → Change it to "Enabled" → Press F10 to save the setting and exit.
4. Intel desktops:
① Reboot the PC and access BIOS: Right on the first interface after booting, repeatedly press "F1" to access BIOS.
Remark: (What if I keep on failing to access BIOS because the startup happens too fast?)
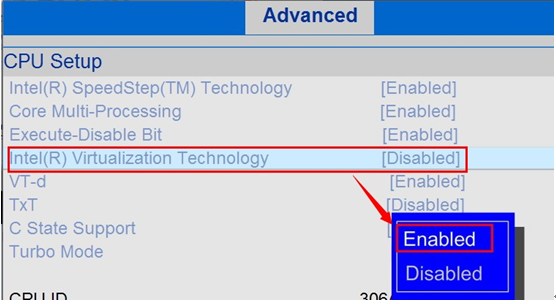
②Select "Security" → "Advanced" → "CPU setup" → "Intel(R) Virtual Technology" → Change it to "Enabled" → Press F10 to save the setting and exit.
5. AMD desktops:
① Reboot the setting and access BIOS: Right on the first interface after booting, repeatedly press "F1" to access BIOS.
Remark: (What if I keep on failing to access BIOS because the startup happens too fast?)
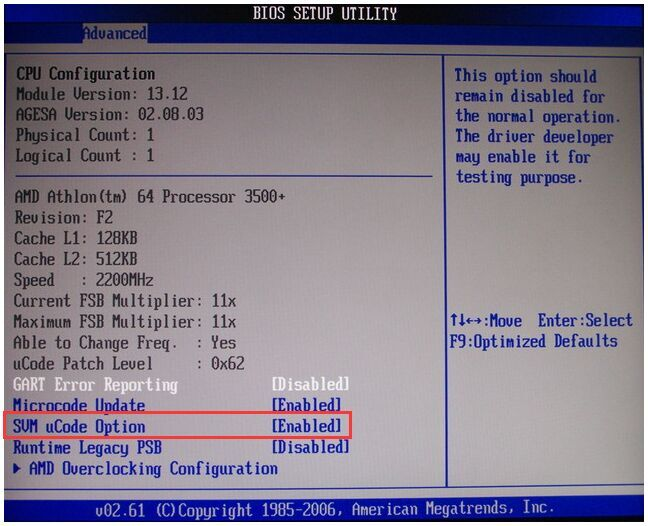
② Go to "Security" → Find "SVM uCode Option" → Change it to "Enabled" → Press F10 to save the setting and exit.
 Visit Lenovo's official website to learn about other alternatives.
